Showing posts with label Crafts. Show all posts

Thursday, May 19, 2011

Porch Hanger

Can you ever have too many places to hang cute signs or decorative items?

I think not!

Though I’m pretty sure there are some (even in this very same house for shame) who would disagree. I guess we all can’t be sane logical people…

This was my DIY solution to the problem, a beautiful porch hanger for all my seasonal signs/decor or anything else I want to use it for

IMG_3108sig IMG_3107sig

I am loving building things lately, it makes me feel very handy-girlish.

I’ll have a tutorial up soon for this so check back and let me know what you think.

Wednesday, April 20, 2011

Pottery Barn Wood Clock

You know, any company that can make an unmade bed look good is A-OK in my book and Pottery Barn seems to do just that. I get pretty excited when I see that PB catalog or “inspiration book” as I like to call it sitting in my mailbox. Yeah I know, I’m pretty easy to please. So when I came across this faux clock I had to give it a try.

pottery barn clock 2[6]

See it way in the background? I don’t know how they do it, the coffee table is a mess and yet it still looks “put together”, why can’t I pull that off at my house?!?! I’ve got to be lacking some ability.

Moving on…..

I kind of have this thing for clocks, I have them all over the house……………mind you they don’t really have batteries in them so it really defeats the purpose but you know, tomato, tomAto who’s counting.

To start I hit up the lumber store and had the HB calculate how many pieces of wood I needed that would waste the least and get around a 30+inch square. Hey, he is also pretty good at calculating shopping discounts, so I keep him around. I only needed about 4 pieces of lumber and had the nice guy cut them at 30 inches for me which ended up costing me a whole whopping like $6.

Once home I used wood glue and clamped the pieces together overnight.

IMG_3085sig

I had originally taken pictures of the next step but discovered when I uploaded them they were no-where-to-be-found. I’m thinking maybe next time the camera blinks at me and then shuts off that I should probably pay attention………Lesson learned for next time.

Anyhow, it’s pretty simple even without pictures.

1. Glue pieces together

2. Stain wood

3. Paint wood color of choice

4. Find center and draw circle around outside, whatever size you want.

5. Paint circle and roman numerals whatever color you want

6. Distress!!!

And here is my lovely Pottery Barn inspired clock

IMG_3091sig

I decided I didn’t want all the numerals but instead the major four for less “clutter” and added a statement to the center. I love how it turned out and how it looks like it’s been sitting in a old barn for awhile (ha ha get it, barn, pottery barn I kill myself)


As always I link to these parties

Wednesday, April 13, 2011

Spring Wreath

It’s Spring right? I ask because I’m not sure mother nature has made up her mind yet, either that or she has REALLY become fond of teasing me.

Tease me with the sun if you must oh cruel lady but I. will. make Spring themed decor! If nothing else but to trick myself into feeling like its warmer outside……………or maybe that is my hand still burning from the hot glue? Eh.

This is my, please of please say it’s Spring wreath.

IMG_3077sig copy

I purchased a wood wreath form for a dollar and covered a portion of it with moss

**Enter the burnt hot glue hand, Yes I said H-A-N-D not just finger because what is the fun in that! Might I suggest not gripping the moss as I’ve discovered hot glue seeps through moss quite easily.

After the moss glue dried and the tears stopped flowing………I kid…………no really, then I attached the butterflies and a bright yellow ribbon. When I see it, it reminds me of a little fairy garden and I love how whimsical it feels.

Total cost- $4 with supplies left over.

Monday, April 11, 2011

Mail Holder DIY

Yes, I’ve been quite MIA but lets not focus on the negative and get on with the goodness.

I have to say if I were a superhero, my nemesis would be paper clutter and more specifically mail!

I can see the outfit now, I’m thinking something in pink with a letter opener on it and lightening, yes lightening would make it very “official”. Maybe some ruffles?

Ok ok, back on track.

I hate when my entry console looks like this

randomrecycling.blogspot mail clutter before2Source: randomrecycling.blogspot

You caught me, that isn’t really MY entry console. I’m all about being “real” but it gave me hives to think about posting my mess for all to see.

Something had to be done to contain the evil genius that is mail clutter………I’m pretty sure my mail carrier is a sidekick of some sort. So I broke out my big boy power tools and built my secret weapon.

I added not only the holders for mail but clips and space for either important reminders or a calendar.

 IMG_3076sig copyIMG_3073sig copy

I’m pretty happy with it, especially considering it’s the first thing I’ve really built completely from scratch and had no directions what.so.ever.

Not to mention the total cost to me for this project was about $5, I don’t think you’d be able to get away with that at Pottery Barn or Ballard Designs!

Now to try and actually get the HB to remember to use it.

Please check out these wonderful parties I’ll be linking to HERE

Tuesday, February 8, 2011

Giddy Up! Wall Decor

My sweet friend is having a baby and picked the most adorable “western” bedding for the nursery.

Since I secretly have a deep desire to decorate a nursery love to decorate and jump on ANY chance I get to do so, the ideas started rolling.

I first thought I’d do some adorable “baby-ish” decor but thought it might be nice to have something that could grow, and be used in an older child’s room also. Here it is

IMG_3042CLBsig

I had originally planned to do the child’s name but try as I might, I couldn’t get it out of her. (She claims they don’t know yet, but I think it’s just a surprise!)

Soooooo, the next best thing was the versatile “Cowboy”, which I am quite please with and can’t wait to give to her.

Sunday, January 30, 2011

Wordy Pillows

I’ve been looking for rectangular pillows for my sofa for awhile now, but nothing seemed to fit. I’m picky.

I happen to find the perfect fabric (yep on sale from over $8 a yard to $1.50) and decided it was time to try freezer paper. I found a quote I loved, cut my stencil and used fabric medium.

 IMG_3025CLBsigtm

IMG_3025CLBsigrbn

I really like them and love the old world-ish, not perfect writing to them.

Linking to:

All the Parties I like to HERE, please check them out!

tatertotsandjello.blogspot 978446890_7b2ZN-O alittlelovelyblog.blogspot saturdaysoireebutton-2MM DIY Blog button iheartnaptime.blogspot iheartnaptimebuttonsundayscoop singingthreelittlebirds.blogspot singingbutton-1-1-1-1 bystephanielynn.com party makingtheworldcuter.blogspot.com MondayCuter JSIWU_BUTTON skiptomylou.org MadeByYouMonday

craftskeepmesane.blogspot th_DSCF63832j-a-girl.blogspot.com blogbutton1_Page_2

Thursday, January 27, 2011

Headboard Love

There were no tears this time! (if you are wondering what the heck that means, please check out THIS post)

Here is the finished headboard and I L.O.V.E, be my valentine-hugs and kisses, LOVE IT!

IMG_3015CLBsig

The whole headboard will be about 1ft taller once it’s hung. It is just resting on the box springs in this picture since I was too impatient excited to wait.

I wish you could actually see the crystals I used for the tufting, but they seem to be camera shy. I swear I tried all but hanging from the ceiling to get a good picture and it was.not.happening.

Here is the best I could get.

IMG_3018CLBsig

The new fabric is so soft to the touch and has the most amazing texture. Bonus, it is such a perfect neutral so I can change my mind which happens A LOT all I like and it will still work.

Total cost was less than $70! (more than half of that was for FOAM!)

Linking to:

j-a-girl.blogspot.com blogbutton1_Page_2beforeAndAfterButton

Thursday, January 13, 2011

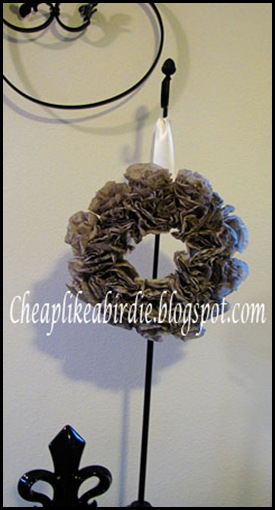
The Humble Coffee Filter

IMG_2980sigYou all know I love the after Christmas shopping, but this year was a

BIG.OLE.LET.DOWN

Well, till I found a cute wreath stand for $3 and knew a coffee filter wreath project was in store.

I apologize for the lack of pictures, I couldn’t find the camera at the time (I’m pretty sure the camera troll had it!) and I’m a bit impatient!

I started out with a green floral foam wreath shape, a roll of ribbon and a pack of white coffee filters from the dollar store.

I wrapped the foam with the ribbon (it takes almost 4 yards) because I didn’t want to cover the whole thing with filters and didn’t want the green to show. Plus, I hate the little dust that comes off the floral foam and knew the ribbon would help.

IMG_2979sig

I wanted the filters a specific color so I filled a bowl with an inch of water and and added acrylic paint till it was the perfect color. I dipped the filters in the water and since I’m slightly majorly impatient I placed them single layer on the oven racks at 200. They are practically dry by the time you push the rack into the oven so be careful, I ended up with a few that looked like chicken with nice grill marks!

On a side note, if you decide to dry them in the oven you might want to mix up a cake or cookies to bake later. The sheer look of disappointment on my HB’s face when he asked what I was baking and the answer was “Coffee Filters” was quite sad.

After they are all dry you simply fold the circle in half and then into a snow cone shape and hot glue it down, and you’re done.

IMG_2977sig

The whole wreath took about 35 filters total for the fullness I wanted and I’m pretty happy with it. I’m thinking I may make a pink one for my office.

Thursday, December 16, 2010

Wood Block Picture Frame For Less Than A Dollar

Very creative title right? I know!

A few five months back I found these adorable mini clothespins on clearance

Clip

Now, I’m a sucker for all things mini (and clearance) so there was no way they weren’t coming home with me! I thought they would be really cute to hold pictures or notes with but then TB kicked in and they sat in the “to do” pile.

You know, TB- Tired Butt Syndrome!

However, on a recent blog tour I found some ladies who really have my number! Shanty2Chic posted some so cute I could pinch their cheeks wood frames and after I finished thinking “See the cute things you could have made a few FIVE months ago if you hadn’t had TB!” I got to work.

 IMG_2943sig

No I didn’t have a picture handy and yes that is a sideways Christmas card. Ha!

Now I can not only check something off my “to do” list, but my Christmas shopping list as well.

IMG_2944sig

I sure hope my sister likes her present.

Since I haven’t done a CLB Cost Break Down for awhile here goes.

Cost Break Down:

Wood Board- .10 cents (Cut for FREE)

Clothespin- $1 for a pack of 50 or more

Knob- .50 cents

Flowers- FREE from scrap material

Paint- .98 cents (FREE to me since I had it on hand)

Total: Less than a dollar!!!! (Shhhh, don’t tell my sister)

Linked to:

JSIWU_BUTTON sewmuchado.blogspot SMAbuttonWDIWargylecopy-1 bluecricketdesign.net 007aff7f-ac52-4787-9912-dd9c57a50d0b___Selected todayscreativeblog.blogspot.com getYourCraftOnResized somedaycrafts.blogspot.com THEEj-a-girl.blogspot.com blogbutton1_Page_2beforeAndAfterButton

Tuesday, December 14, 2010

3ft DIY Reindeer

Have you ever been out shopping and found the P-E-R-F-E-C-T item?  Well, perfect if it were say

Another color?

Taller?

Etc.. Etc…

Yes, yes, it happens to us all! I admit, it’s usually clothes but here is my most recent “I’d love it IF” item.

CLB Silver Deer

I found this little cutie in front and just loved it, the problem was it wasn’t near the size I wanted for the space I had in mind. Besides, bigger is better! Especially if you’re talking Christmas decor!!!!

Can you believe it is DIY? I think it looks amazing and I am so thankful for my ML taking the time (something I’ve been pretty short on lately) to make it for me.

You can’t even imagine how much this thing sparkles and the pictures just can’t capture it. Here is an attempt. (a poor one!)

CLB Silver Deer Head

I honestly considered the title of “Photographing Glitter is for the Birds!!!!”

Oddly enough it looks gold in that picture when it is in fact a tarnished silver and sparkles better than some diamonds I’ve seen.

I can’t wait to see what other wonderful goodies I can create using the same technique!


Monday, October 11, 2010

Pumpkin Carving

Heading to the pumpkin patch and picking out my own pumpkin to carve was a necessity this year! I haven’t carved pumpkins in years, but this year feels different and more traditional so it was a must.

I fully planned on taking a bunch of wonderful “oh this day is so fun” pictures

BUT

when we got to the patch there was a bunch of this

dailiness.com mudClick Photo for Credit

So just imagine this

zimbio.com Alyssa Braun Annual Mud Day Celebration Lets Kids Get Dirty rOS7KBcnzkelClick Photo for Credit

with a few pumpkins around me!

Once I was able to get home and cleaned up the magic started.

I originally planned to carve something very Halloween-ish and then figured, why not do something a little more me. So I did.

IMG_2851sig

If you look close you can see the crown reflection shadow on the wall in the back. I had so much fun that I’m thinking of doing a whole princess collection.

Have you carved your pumpkins yet?

Friday, October 8, 2010

Metallic Pumpkins

IMG_2830sig

Orange just wasn’t doing it for me this year! I wanted metallic pumpkins but the price was making me think “maybe not”

IMG_2804sigAs I started digging out the fall decor I came across the fall items I picked up last year for 90% off. I don’t know about you, but finding things you forgot you purchased last year is a happy place moment.

I first tried a copper colored spray paint and was quite disappointed, the color was so muted and just blah.

Plan B, acrylic paint! It did the trick wonderfully and I adore the result.

IMG_2806sigCost-

20 tiny pumpkins/gourds $2.00

3 small pumpkins $.30 (yep 30 CENTS! Thank you 90% off)

1 medium pumpkin $1.00

Paint- $.89 if I hadn’t had it on hand already 

Wednesday, October 6, 2010

Boo Bags

IMG_2825sig

Have you been booed?

I thought it would be great to start this cute tradition in my neighborhood this year and this is what my neighbors have found on their doorsteps.

IMG_2826sigIt brings a smile to my face each day I go past a neighbor I’ve booed that has this cute “Boo” hanging on their door.

For this boo I started with a treat bag filled with all sorts of Halloween goodies. I created the door hanger using paint and a foam shape and then attached a scroll with instructions and a cute “You’ve been Booed” poem.

Have you started this tradition in your neighborhood? If not, give it a try. We could all use a little sense of community in our neighborhoods these days.